
目录(7 节)

·
Open a Mac's iOS Project from Omarchy with Tailscale and T3 Code
A hands-on log: connecting an Omarchy Linux machine to a MacBook Pro over Tailscale, pairing T3 Code, and opening an iOS project on the Mac for Claude Code. Covers the sudo snag when installing Tailscale, a relayed (DERP) connection test, what t3 pair --tailscale does, and the git check and CLAUDE.md setup before starting work.
Tested November 14, 2026, with T3 Code 0.1.9 and Tailscale 1.104.2. Hostnames, IPs and the pairing code have been replaced.
The previous post covered what T3 Code is and how it compares with similar tools. This one is a hands-on log: sitting at a Linux machine running Omarchy, connecting to a MacBook Pro over Tailscale, opening an iOS project that lives on the Mac in T3 Code, and handing it to Claude Code.
Claude Code walked me through the whole setup from the Linux terminal. It installed software, checked status and tested the connection. It also hit one snag along the way, which is described below as it happened.
First, decide what runs where
iOS projects build with Xcode, and Xcode only runs on macOS. So the project, Xcode, Claude Code and the T3 Code server all stay on the Mac. Omarchy only shows the interface and takes keyboard input.
Tailscale links the two machines into a private network. It is built on WireGuard: every device signed in to the same account gets a 100.x.x.x address and can reach the others directly, with no router ports to open.
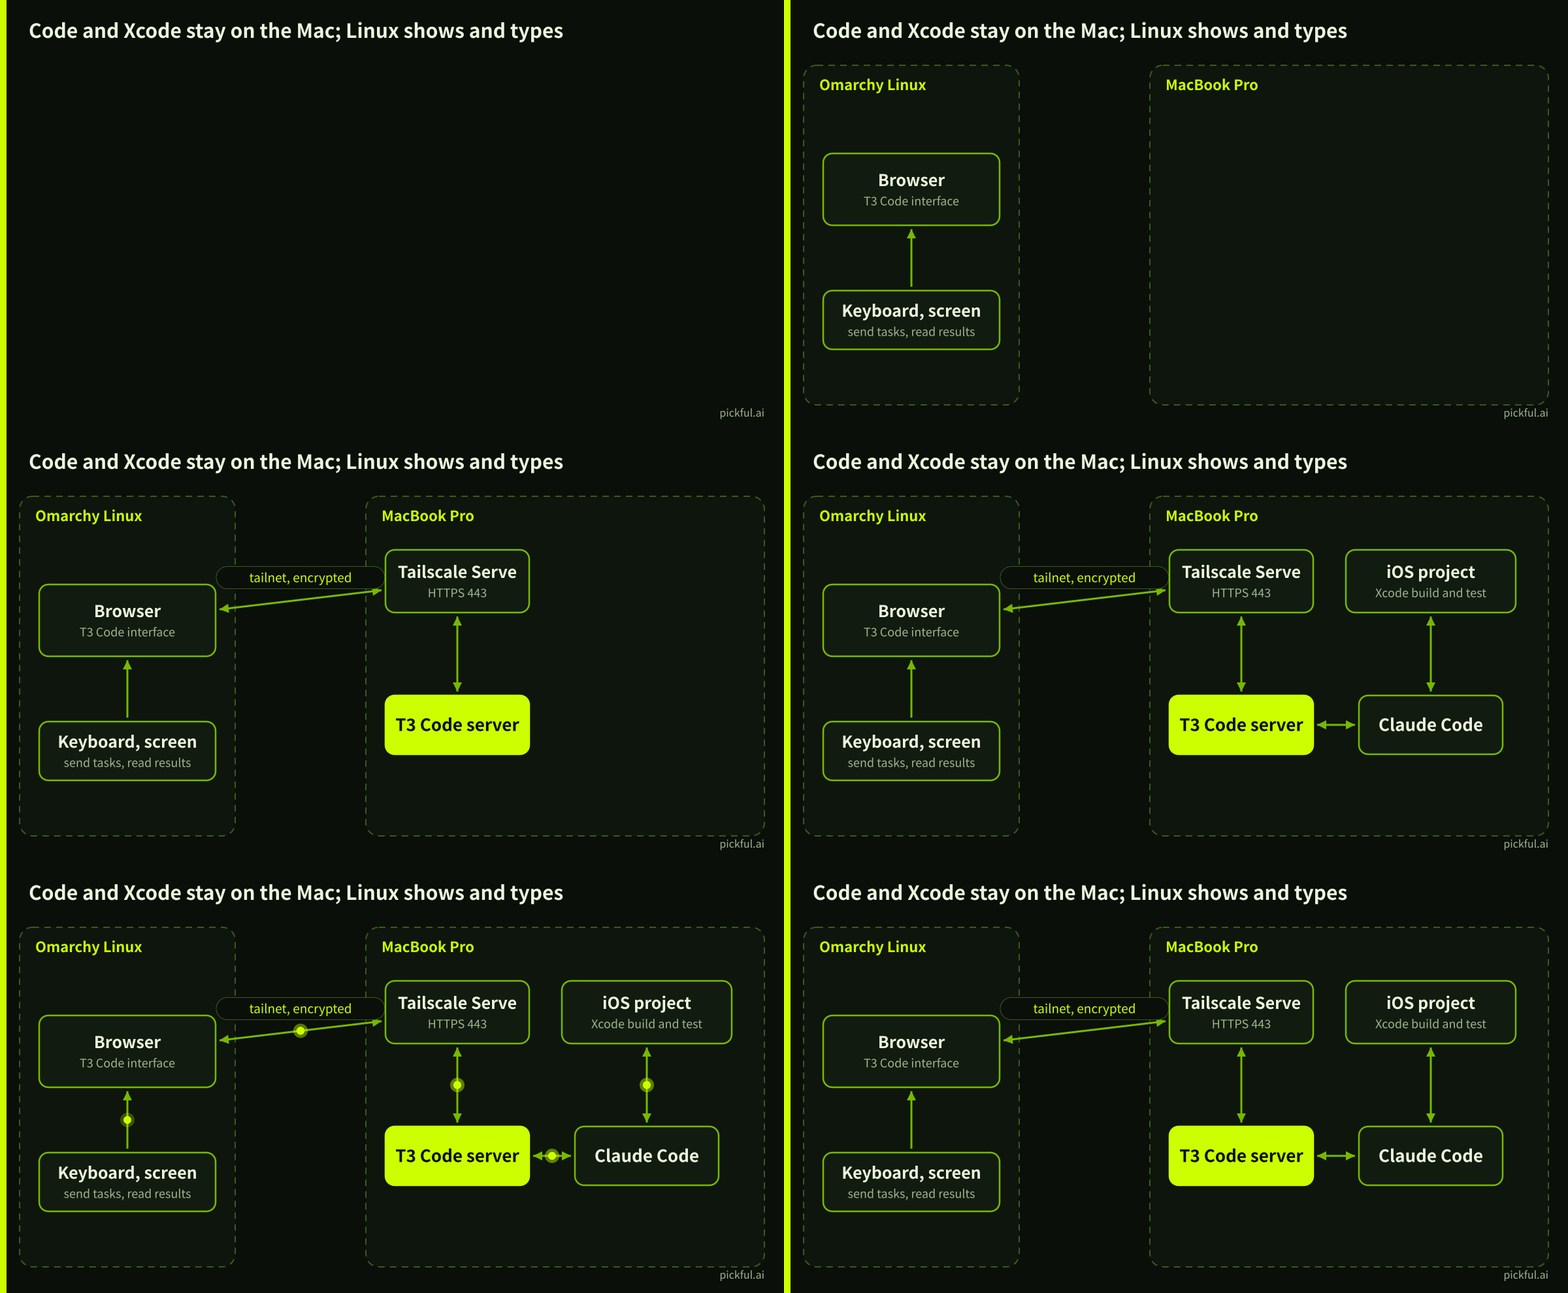
Every command Claude Code runs, such as xcodebuild, runs on the Mac. Omarchy sees the results.
Three ways in; this time, Tailscale
When you run t3 up on the Mac, T3 Code asks how other devices should connect. According to t3 --help, there are three options:
- T3 Connect: sign in with a T3 account; works across networks, relayed by T3’s service.
-
LAN (
--lan): any device on the local network can reach the port; the pairing code is the only lock. -
Tailscale (
t3 pair --tailscale): only devices signed in to the same Tailscale account can reach it, and HTTPS is set up automatically.
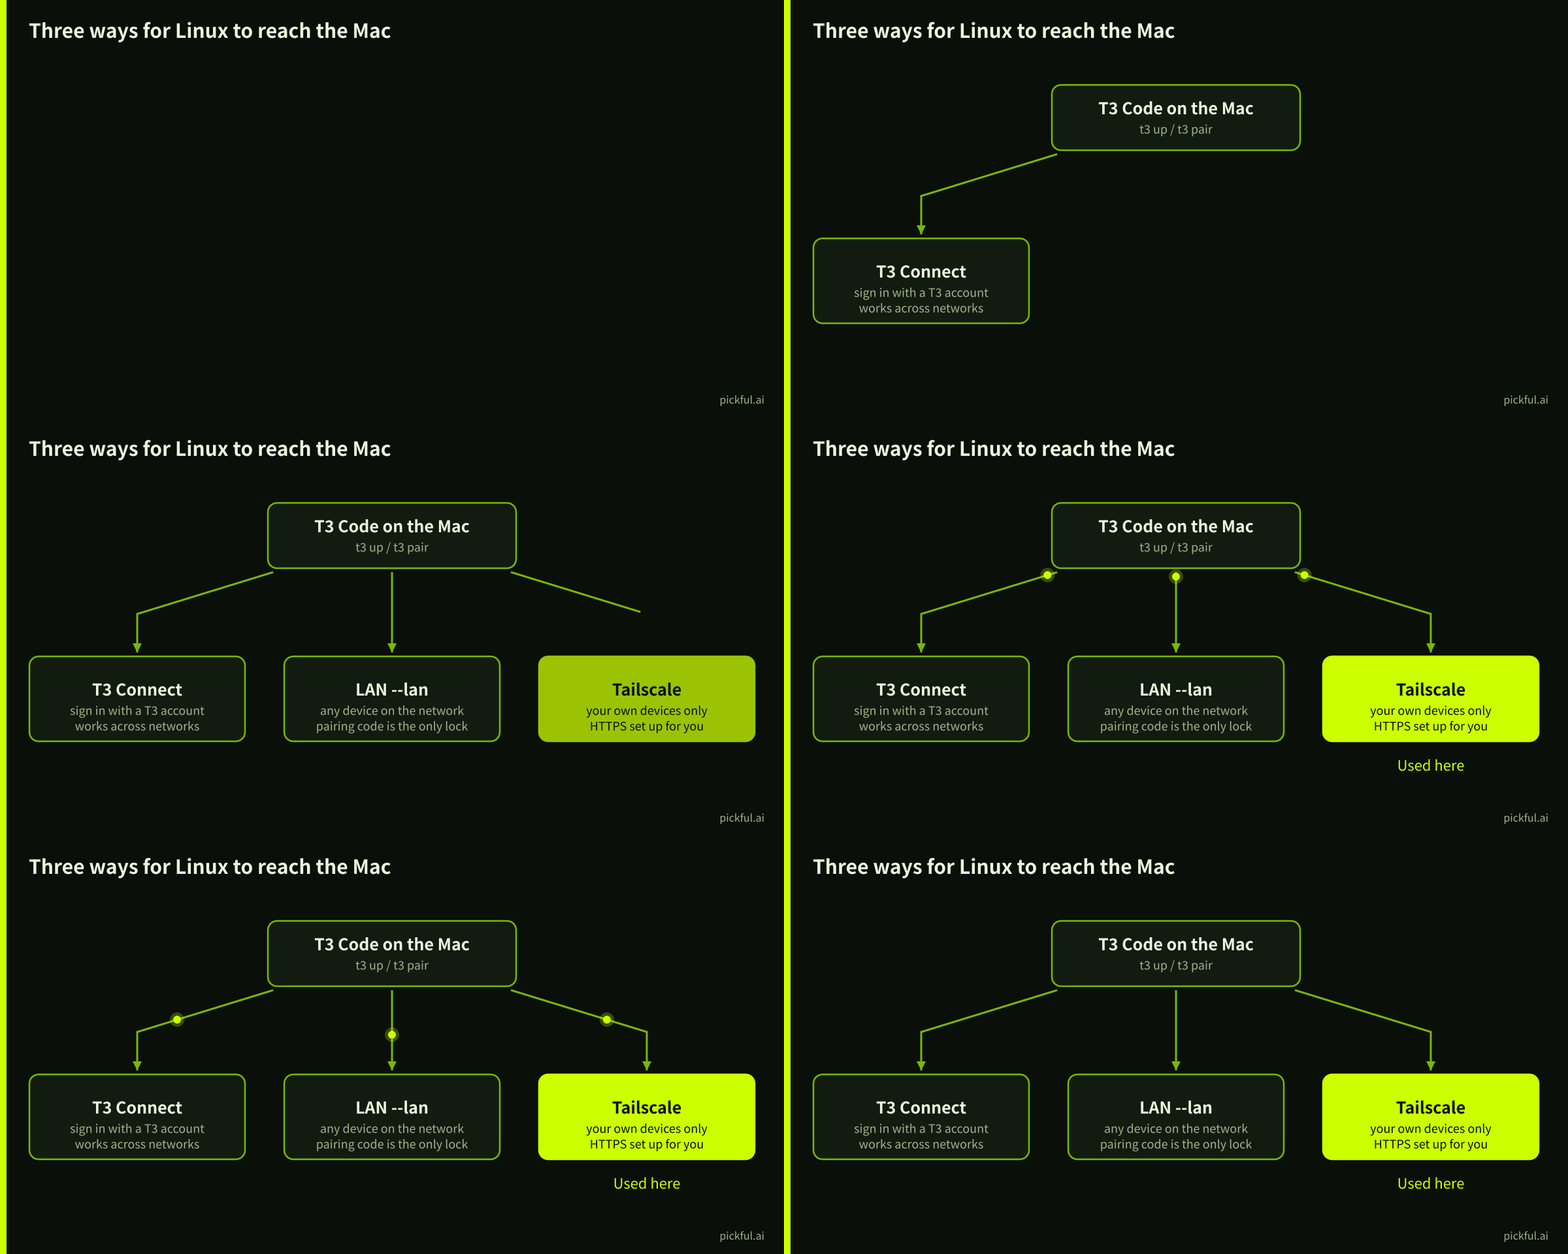
I picked Tailscale for two reasons: the Mac and the Linux machine are not always on the same network, and access stays limited to my own devices, which is tighter than opening it to the whole LAN.
Step 1: Install Tailscale on Omarchy
Omarchy ships an installer, omarchy-install-service-tailscale. Reading it shows five steps: install tailscale with pacman; enable the tailscaled service and run tailscale up; make the current user the operator so tailscale commands no longer need sudo; turn on Taildrop file receiving; and add a Tailscale icon to the status bar.
Here is the snag. Claude Code can’t type a sudo password for you, so it suggested running the script from its prompt with the ! prefix. Every sudo step failed:
sudo: a terminal is required to read the password
Commands run with ! have no terminal, so sudo can’t ask for a password. The steps that didn’t need sudo did succeed, which left a half-installed state: the status-bar plugin and the Taildrop service were enabled, but Tailscale itself was missing. The system even skipped the Taildrop service because /usr/bin/tailscale didn’t exist.
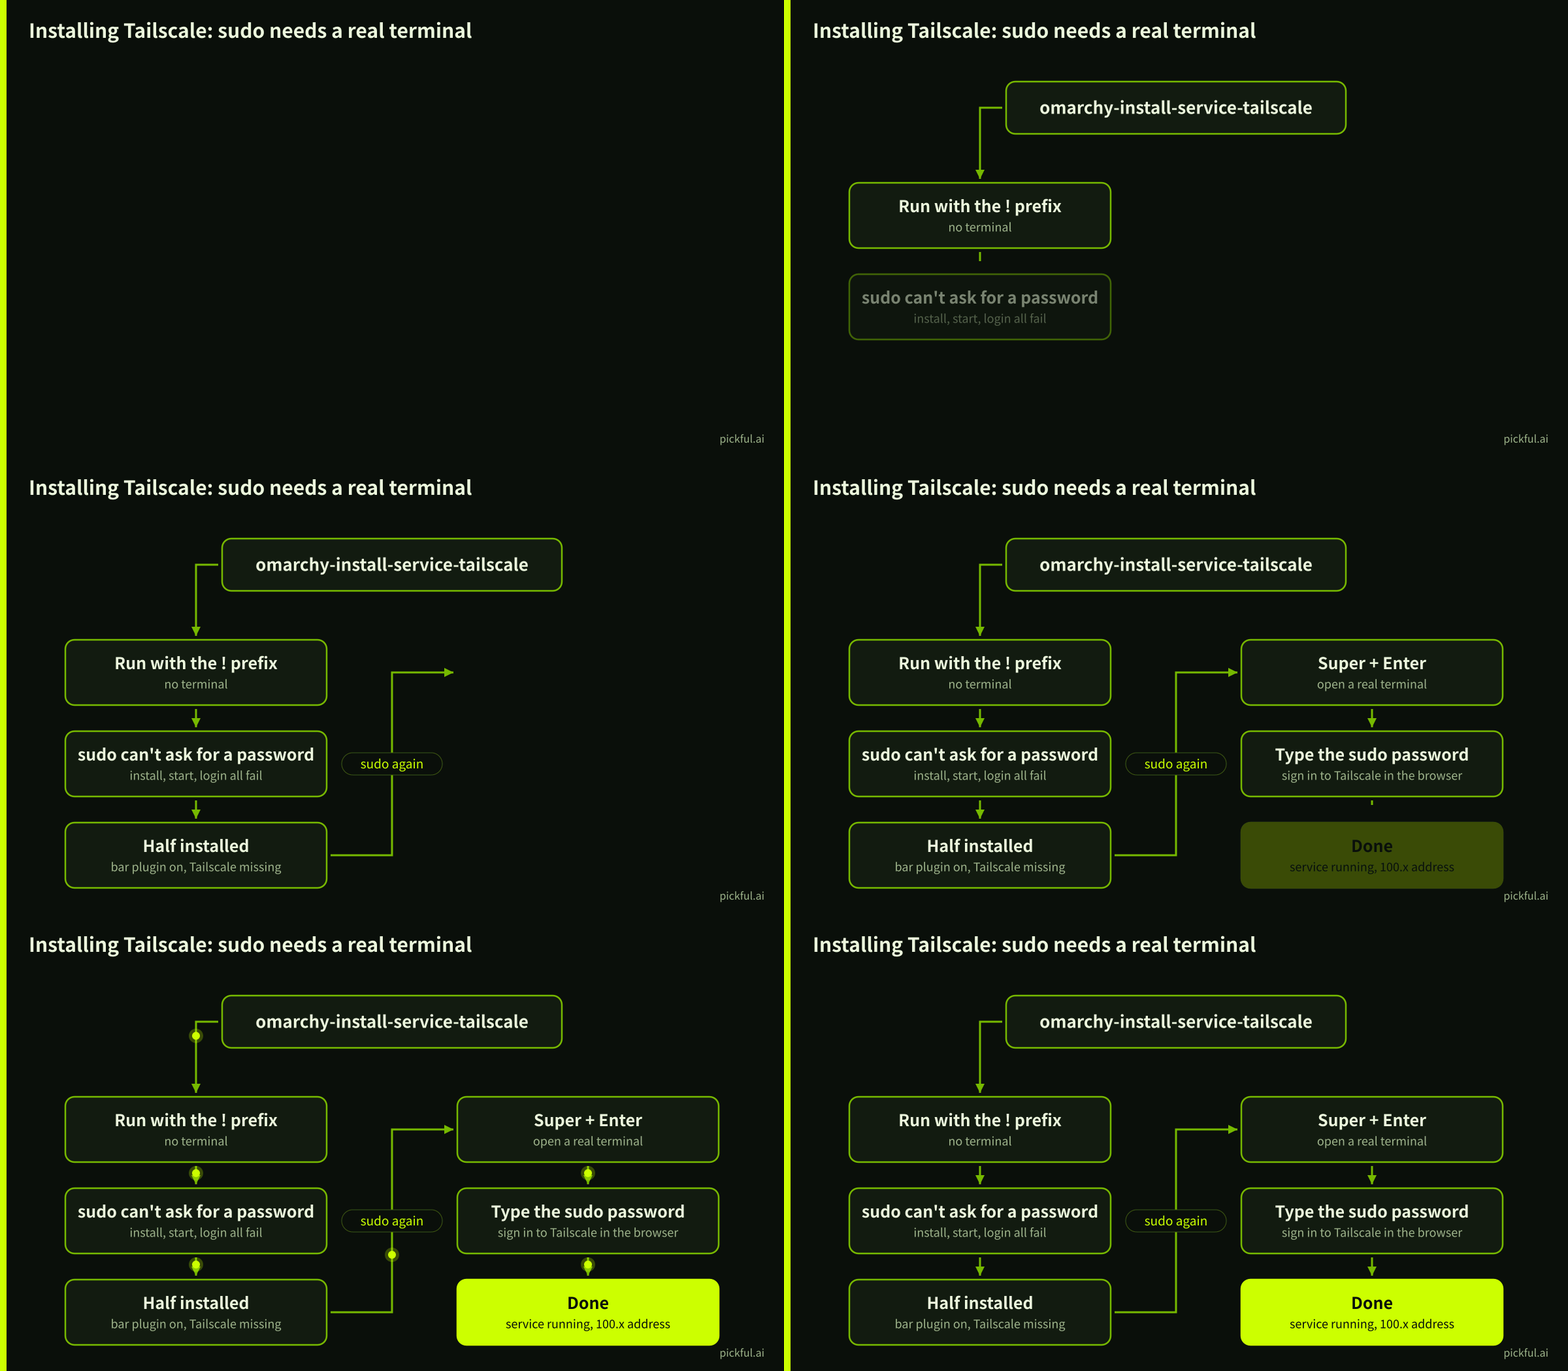
The fix: press Super + Enter to open a real terminal and rerun the three sudo steps:
sudo pacman -S --needed tailscale
sudo systemctl enable --now tailscaled.service
sudo tailscale up --accept-routes && sudo tailscale set --operator="$USER"
tailscale up prints a login link; open it in the browser and sign in. When Claude Code checked again, everything was in place: tailscaled running, a 100.x address assigned, the operator set, and the Taildrop service started on its own.
For installs that need sudo, running them yourself in a terminal is quickest. Claude Code is most useful at either end: reading the script before you run it, and checking the state afterward.
Step 2: Put the Mac on the same network and test it
Install Tailscale on the Mac (App Store or the website version), click Log in from the menu-bar icon, and sign in with the same account and the same sign-in method, for example Google again. Otherwise the Mac lands in a different tailnet.
Back on Omarchy, tailscale status listed both devices. Then a connectivity test:
tailscale ping -c 5 <Mac's Tailscale IP>
All five pings came back in 8–52 ms, but every line said via DERP(tor), and the last line read direct connection not established. The two machines weren’t talking directly; traffic was going through Tailscale’s relay server (DERP) in Toronto.
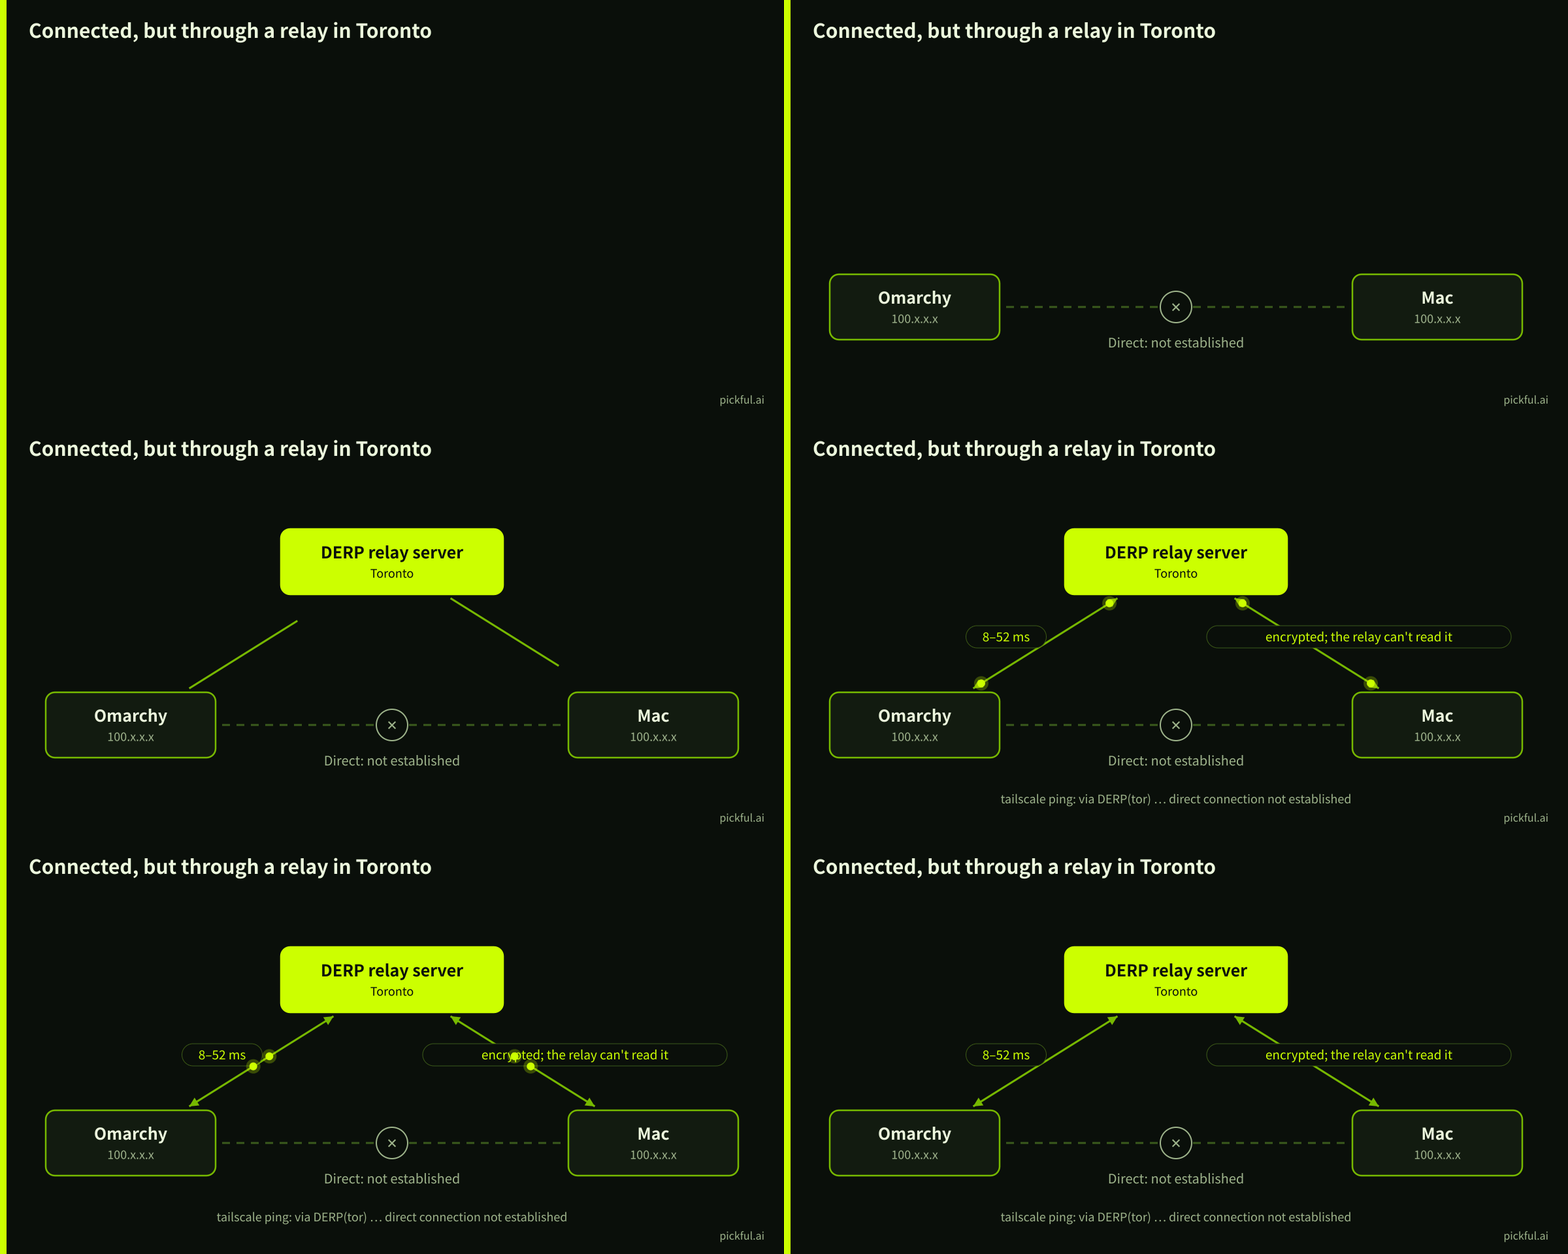
tailscale netcheck showed UDP working on the Omarchy side and an easy NAT type (MappingVariesByDestIP: false). The missing direct path may come from the Mac’s firewall or its network; Tailscale also sometimes takes a while to establish a direct connection.
For T3 Code this barely matters: it mostly carries text and code, and a few dozen milliseconds of latency isn’t noticeable. Relayed traffic is still end-to-end encrypted, so the relay can’t read it.
Step 3: Publish T3 Code on the Mac and pair
In the project directory on the Mac, run:
t3 pair --tailscale --label omarchy --ttl 15m
It does two things:
- It configures Tailscale Serve to map
https://<mac-name>.<tailnet>.ts.net/to the local T3 Code server. The mapping stays in place, including across restarts. To remove it, runtailscale serve --https=443 --set-path=/ off. - It creates a pairing link with the code after
#token=in the URL. Codes expire after 5 minutes by default;--ttl 15mextends that to 15.
On the first run it warned that the HTTPS address wasn’t answering yet, because Tailscale had to obtain a certificate first. A few minutes later, requesting that address from Omarchy returned HTTP 200 in 0.28 seconds, and the certificate checked out.
That test requested the site root without the code, so it couldn’t use the code up. Besides, the part after # is never sent to the server; only the page in the browser can read it.
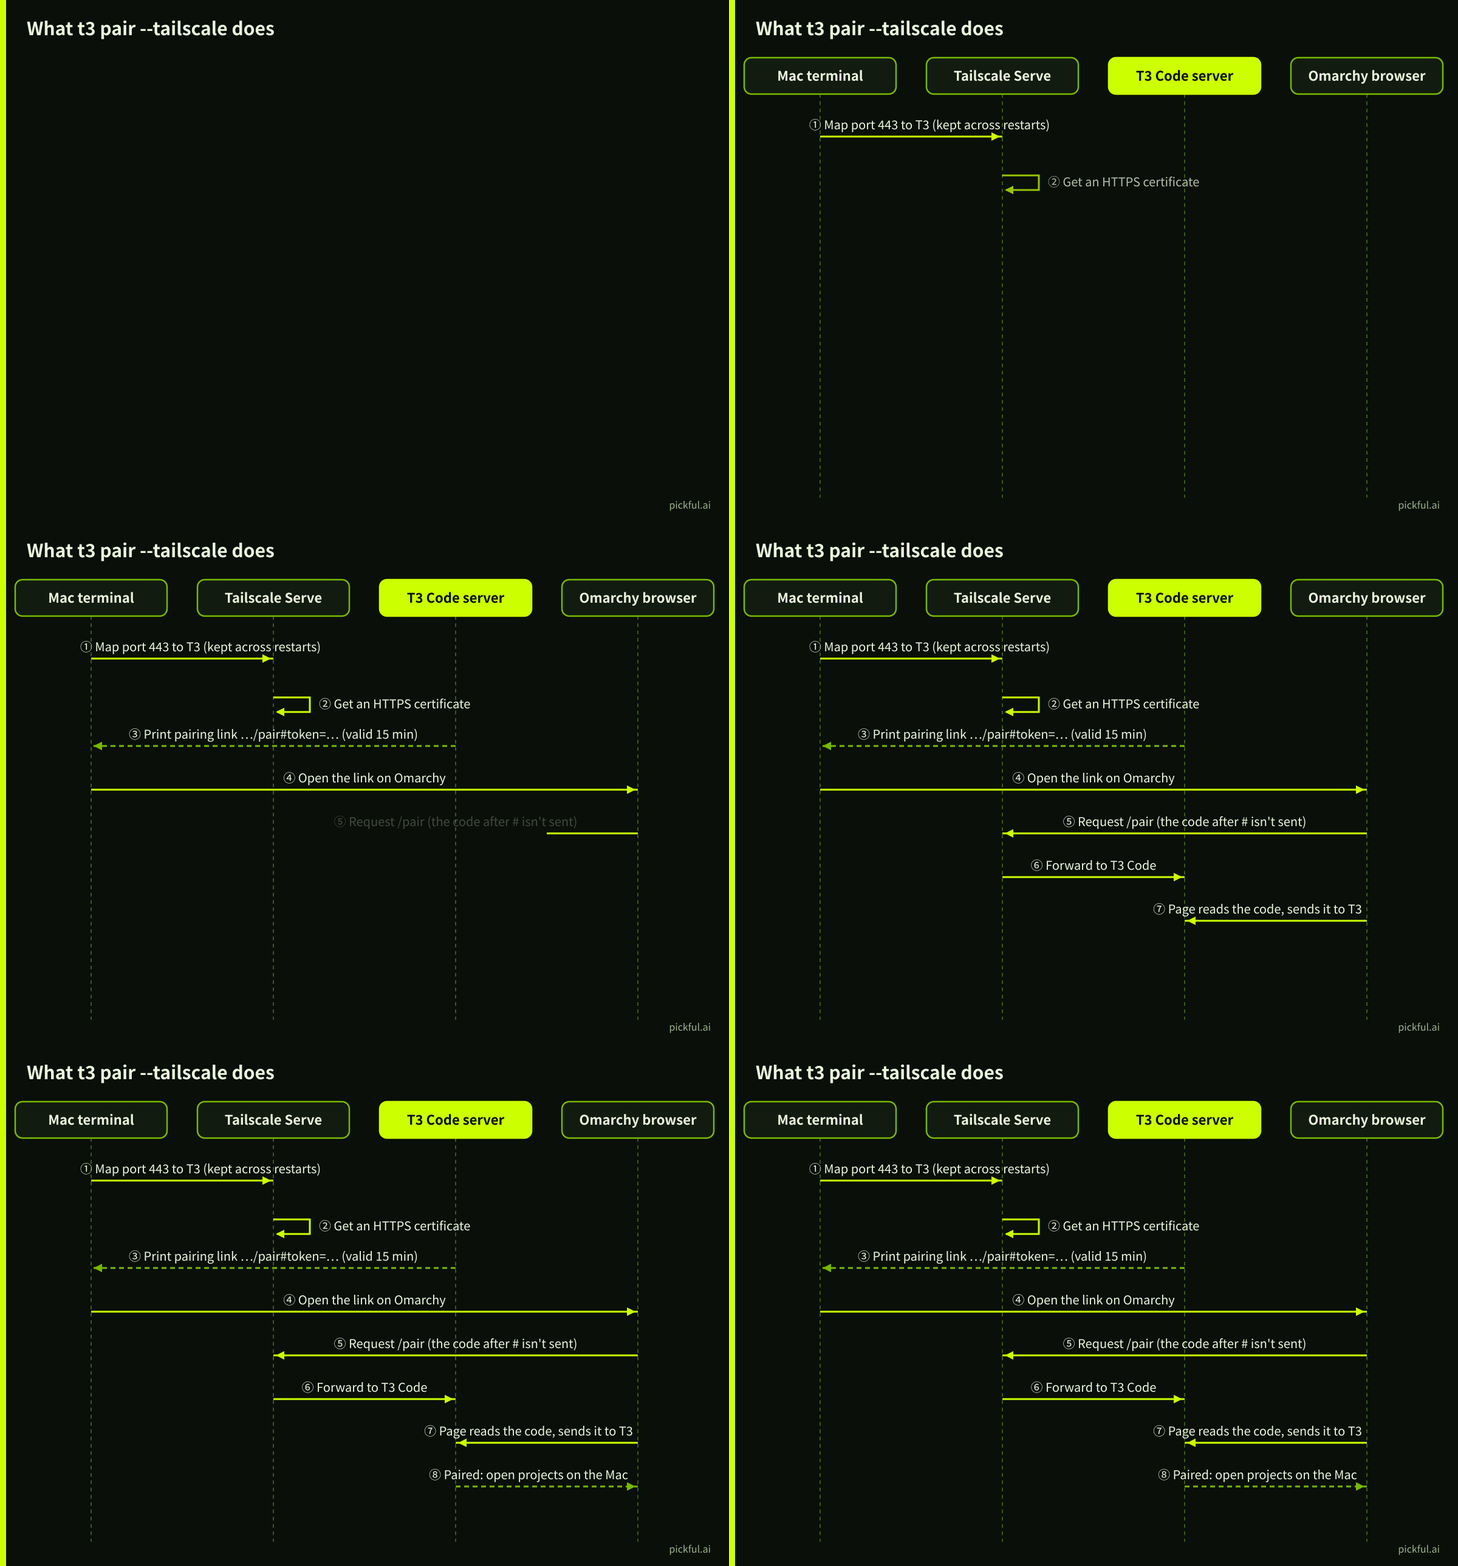
Opening the pairing link in the browser on Omarchy completed the pairing automatically. To revoke this Linux machine’s access later, go to Settings → Connections in T3 on the Mac.
Step 4: Open the project and hand it to Claude Code
After pairing, the T3 Code interface shows the Mac environment. Once the project is open, its panel shows the environment name, the current git branch and the line counts changed against origin/main.
If the project isn’t in T3 yet, run t3 project add <project path> on the Mac, or add it in the web interface with the Mac environment selected.
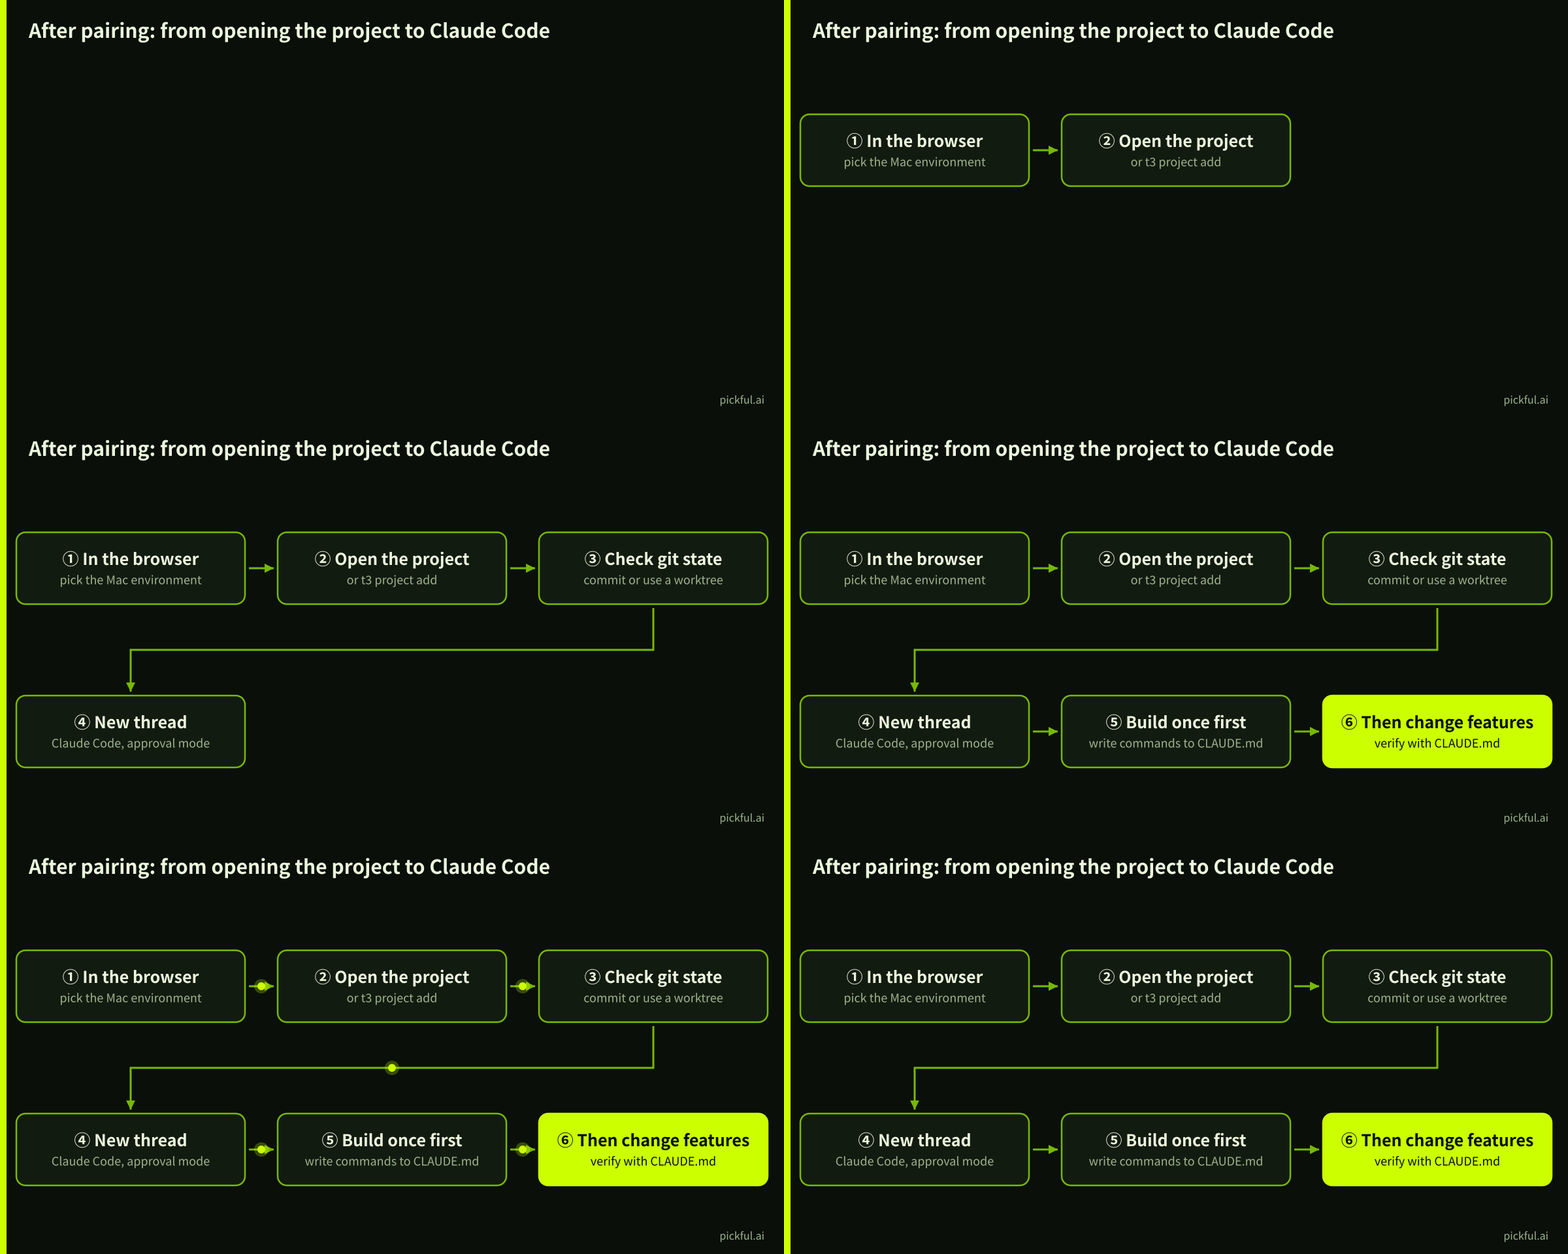
Check the git state before you start. When I opened this project, the current branch already had +51/-20 lines of changes. If that’s unfinished work, commit it first, or start the new thread in a fresh git worktree, so it doesn’t get mixed up with what Claude Code changes next.
The first message shouldn’t ask for a feature yet. Have Claude Code learn the project and confirm it builds:
Look at the structure of this iOS project and find the scheme names and available simulators (
xcodebuild -list,xcrun simctl list devices available). Build once for a simulator and confirm it succeeds. Then write the build and test commands into CLAUDE.md at the project root, and verify every future change with them.
Once CLAUDE.md exists, Claude Code builds and verifies with those commands after each change.
Start with a permission mode that requires approval, so Claude Code asks before every file edit and command; loosen it once you’re comfortable. Signing, certificates, on-device debugging and App Store uploads still need to be handled in Xcode on the Mac, at least the first time.
Checklist
| Step | Machine | Command or action | Watch out for |
|---|---|---|---|
| Install Tailscale | Omarchy | omarchy-install-service-tailscale |
Run it in a real terminal so sudo can ask for the password |
| Sign in | Both |
tailscale up / menu bar Log in |
Same account, same sign-in method |
| Test connection | Omarchy | tailscale ping |
via DERP means relayed, which works fine |
| Publish and pair | Mac | t3 pair --tailscale --ttl 15m |
The code expires; the Serve mapping stays |
| Open project | Browser | Pick the Mac environment, add the project path | Check git state first |
| Start work | T3 thread | Pick Claude Code, build first, write CLAUDE.md | Start in an approval-required mode |
One more thing: the Mac must not sleep. If you use it with the lid closed, keep it on power and turn off automatic sleep in System Settings, or T3 Code will disconnect.
转发此帖子?
与您的关注者分享。
回复